Have you ever thought about starting to code?
Down the rabbit hole
The thing with programming is, when you get interested in it and find out that you actually like it the probability that you become curiouser and curiouser and dive deep into it is high. We at LOTTO24 also take social responsibility and invite young people to get a glimpse into software development as part of the “Girls’ and Boys’ Day” so that they can discover for themselves if it is something they are interested in and enjoy. So let’s find out if you will go down that rabbit hole. 😉
Emmanuel Lange
May 10, 2021 . 7 min read
Through programming, one can gain a deeper comprehension of complex problems as well as the will, the patience and ingenuity to solve them. We need to think creatively and solution-oriented, and to question how and why things work.
We have to:
Understand the task
Think of possible solution approaches
Analyze which solution we want to implement and understand how well and whether the solution works
Think about opportunities for improvements
To better grasp the possibilities, opportunities and risks of software and algorithms that surround us in more and more areas of daily life, it is of great benefit to have a basic understanding of programming. I think this is an important reason why we should all become digitally literate. But what can we do to make sure that we, young and old alike, are not only using technology, but really start grasping it? I think simply trying it out is the best recipe here.
Nowadays there are a number of simple and free applications that can be used to learn the basics of programming for no cost and in a fun way. These applications are available for almost every age and experience level – from simple web applications, to apps, to complex games.
CALLIOPE MINI – What is it?
The Calliope mini is a microcontroller (= a complete small computer on a single chip) that can be used to solve problems using code and hardware, implement ideas, or just to do fun projects.
The Calliope mini was designed so that it can be used by children as young as third grade.
What are some of the Calliope mini’s capabilities?
5×5 LED matrix (display)
Loudspeaker
RGB LED
Buttons
Microphone
Position sensor
Temperature sensor
Bluetooth
More information about the Calliope mini and where to get one can be found here: https://calliope.cc
Where is the best place to start?
Programming the microcontroller is possible via different development languages either
Graphically by arranging programming blocks or
Via text based programming
Depending on your level of experience, it makes sense to first familiarize yourself with the Calliope mini and programming in general. For programming beginners, visual programming is just the thing. Visual programming languages are more intuitive to use than textual programming languages. This makes it easy to learn the basics of programming. For instance, we can learn how conditions, loops or variables work without having to deal with text-based programming.
On your mark, get set, go!
Connecting the Calliope mini
Before we can develop our first small program, we need to get our Calliope mini up and running. First we have to make sure that the Calliope mini is supplied with power. The easiest way to do this is to simply connect the included USB cable to the mini USB port of the Calliope mini and then plug the other end of the cable into the USB port of the computer.
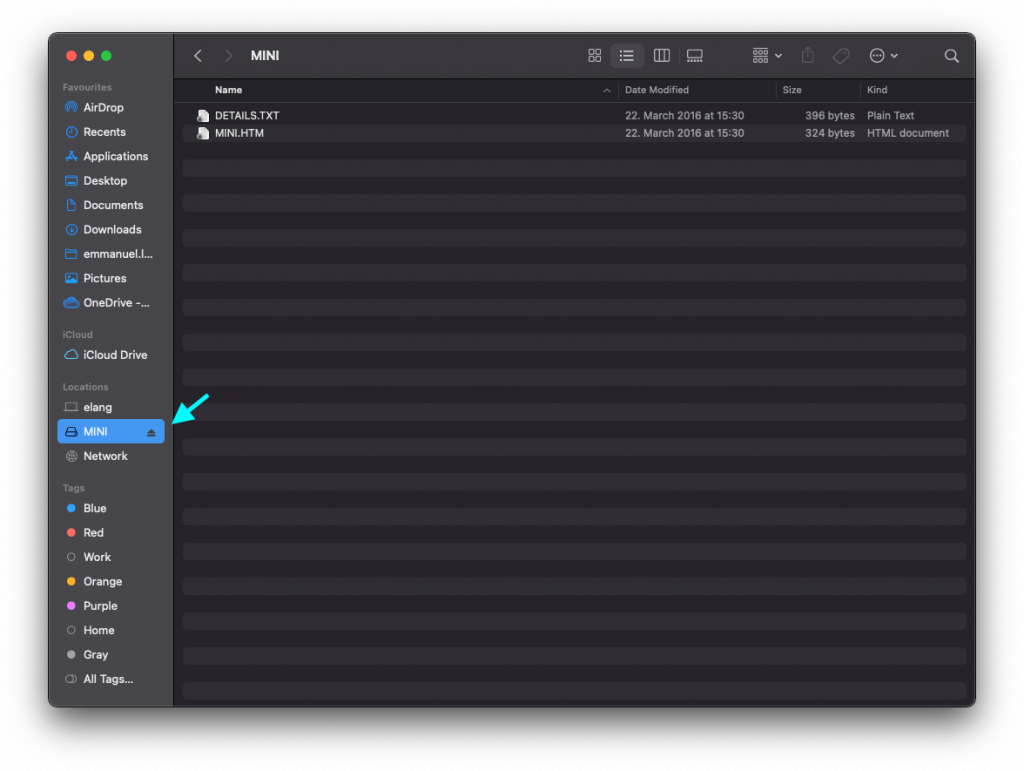
After the Calliope mini is successfully connected to the computer, you should see it as a drive named “MINI” on your computer. If you need more information about connecting the Calliope mini, you can find it on this page: https://calliope.cc/en/lets-start/first-steps
Running the development environment
We will use Microsoft MakeCode as our development environment. MakeCode is a free platform that provides an engaging programming experience for beginners and advanced programmers into the world of programming. We will use MakeCode for visual programming only, but you can also use it to implement your programs in text-based programming languages.
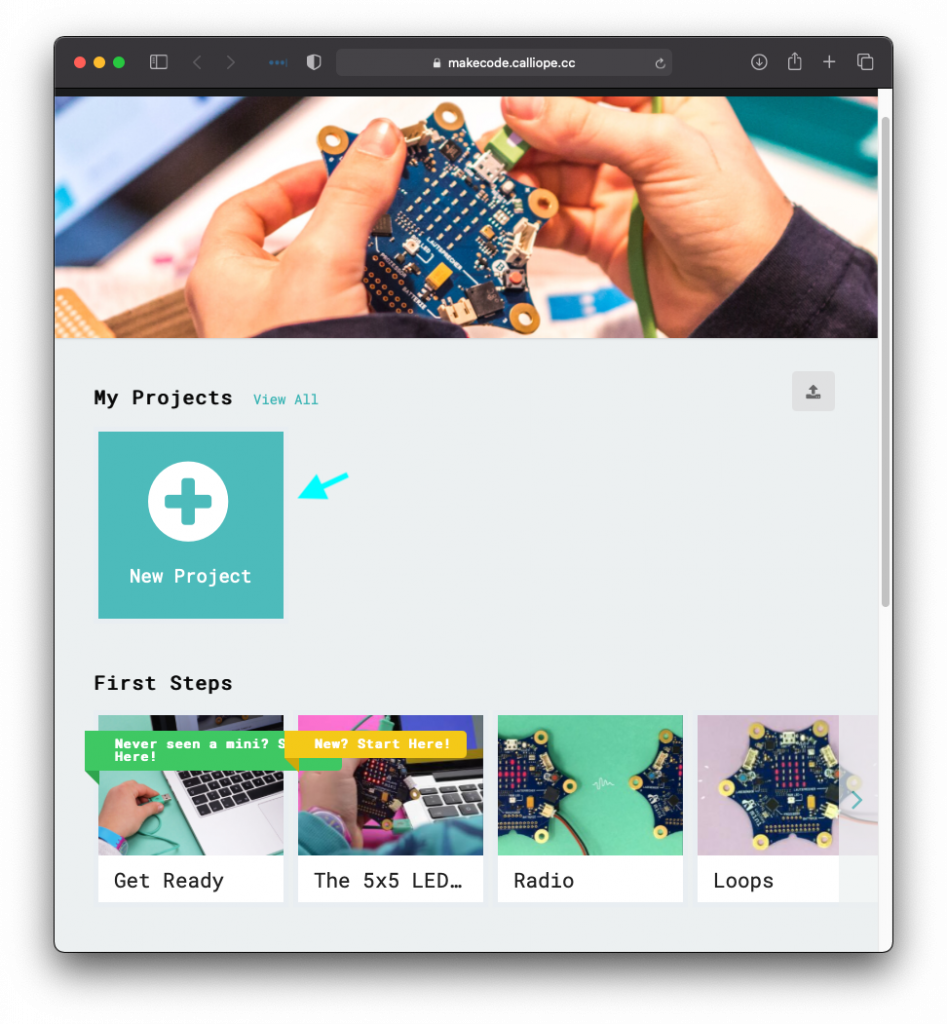
To use MakeCode for our Calliope mini, we just need to go to the following website: https://makecode.calliope.cc
Program 0: Hello World!
And here we go with our first little program. We will write a “Hello, World!” program first. A “Hello, World!” program is a computer program that displays the message “Hello, World!”. Such a program is very easy to implement in most programming languages and is often used to illustrate the basic syntax of a programming language. It is usually the first program written by people learning to program. Furthermore, it can be used to make sure that the development environment works correctly and that the user understands how to use it.
The first thing we need to do is create a new project in MakeCode. In order to do so, we simply click on the “New Project” button and then give our project a name, for example “hello_world”. Now a new window opens and we see our development environment – This is where we build our programs.
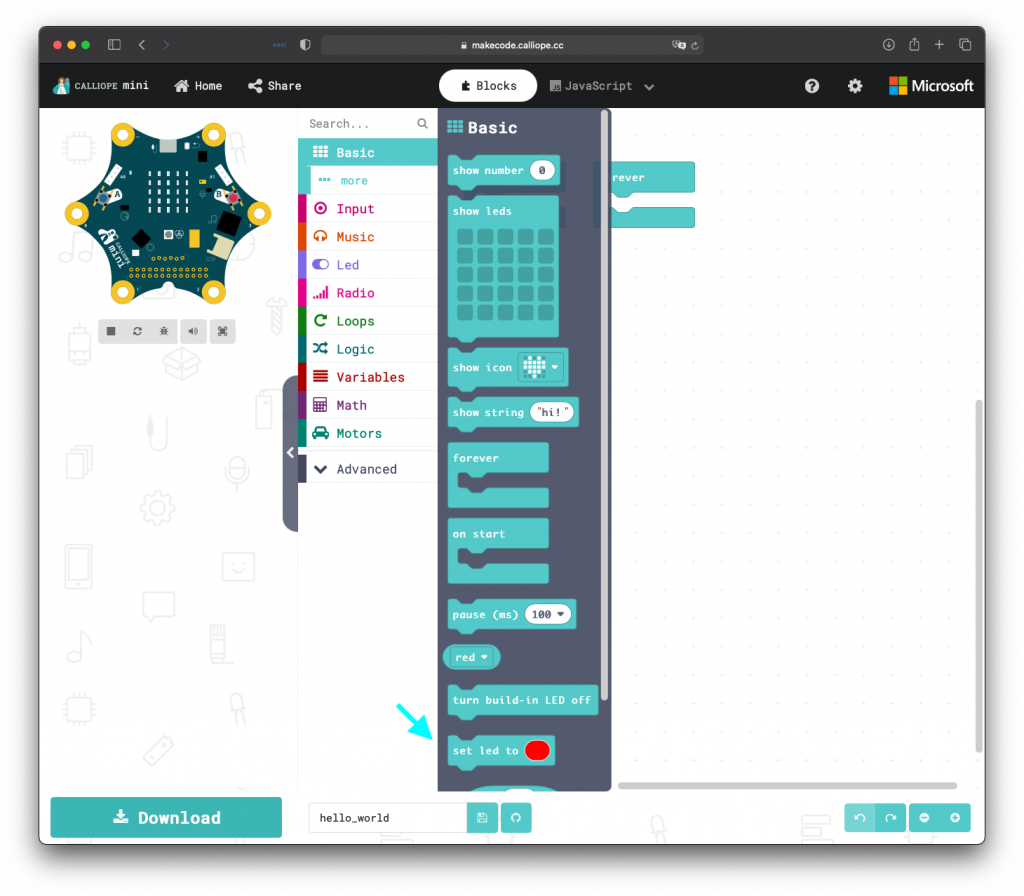
The development environment is split into three different areas:
On the left side we see the so-called simulator. The simulator emulates the functionalities of the Calliope mini and can be used to test our programs without having to transfer them to the Calliope mini themselves.
In the middle part we find the blocks that we use to build our program. Programs consist of several parts, these parts are described in visual programming by individual blocks. In MakeCode we connect the individual program parts (commonly called code) by snapping the blocks into each other. All the blocks together then define our program, which we can execute on our Calliope mini. Blocks can be events such as pressing a button, turning on an LED or displaying text.
On the right side we find the area where we write our program by connecting blocks together.
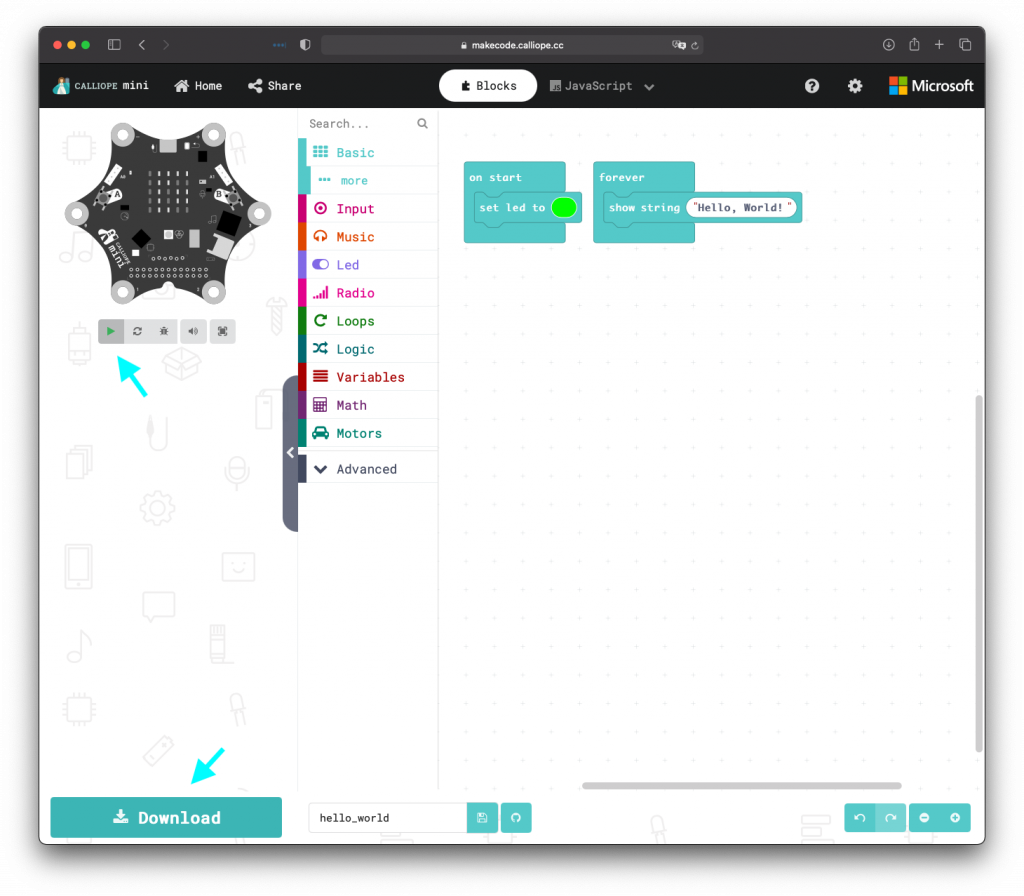
But now let us really get started and write our first program. On the right side we see that two blocks have already been added by default. Within the “on start” block we can add other blocks which should be executed when the program starts. In the “forever” block we can write code which should be executed for the whole runtime of our program.
Steps:
At the beginning of the program, we would like the RGB LED on the Calliope mini to light up so that we also have a visual indication that our program is running. To implement this functionality we select the “set led to” block under “Basic” and put it into our “on start” block.
Of course, a “Hello, World!” program cannot do without outputting the text “Hello, World!” – otherwise our first project would be rather inappropriately named.
The appropriate code block to be able to output text can be found under “Basic” again. This time we select the “show string” block and insert it into the “forever” block. By clicking on the “show string” block, we can set which text is to be shown. Here, of course, we enter “Hello, World!” as the name of the program suggests. When we then start our program, it will output the text “Hello, World!” on the 5×5 LED matrix as a ticker. Maybe you wondered why the block is called “show string” and not “show text”? In programming there are the so-called data types, which in abstract terms tell the computer how the programmer intends to use the data. In many programming languages there is a data type called string. In programming, a string represents an arbitrary string of characters, such as the string “Hello, World!”.
Now we can run the program in the simulator and / or on the Calliope mini. To start it in the simulator, we simply have to press the “Play” button on the left side, under the image of the Calliope mini. If we want to run the program on the Calliope mini, the first step is to go to the “Download” button on the bottom left of our development environment and download the so-called hex file. The Calliope mini does not understand the graphical blocks we use. Therefore, when we download our program, it is converted into a text file that contains our code in a format that the computer understands.So after we have downloaded the hex file, we have to copy it to our Calliope mini. This works the same way as with a USB stick: Just copy the file and paste it on the drive named “MINI”. Now our program will be transferred to the Calliope Mini and start automatically. You should now see the text “Hello, World!” on the 5×5 LED matrix as a ticker.
Hence, we have successfully finished writing and executing our first program. While creating and executing our first small program, we learned all the important basics to be able to independently implement our own ideas with the Calliope mini in the future.
Program 1: Dice
Our first program was very static and didn’t have any interaction with us – it just ran along. Now it’s time to bring a bit more activity into our program.
We are going to develop a dice! Just like a real dice, our dice will randomly display a number between 1 and 6.
After making sure we understand the task correctly, let’s think about exactly what is needed to implement this program. Please take some time to think about which functionalities we need and how you could implement them before you continue reading.
I have come to the following points that we need to implement in order to have the functionality of a dice:
Somehow ensure that a roll is started
Select a random number between 1-6
Display the number rolled
I think you came up with similar points. The nice thing about programming is that there are usually many different ways to solve a task. For example, the idea I came up with is to shake the Calliope mini to start a roll. Maybe you had the same idea or you decided to press a button?
I’m only going to describe one possible solution here, but your implementation could be quite different.
Steps:
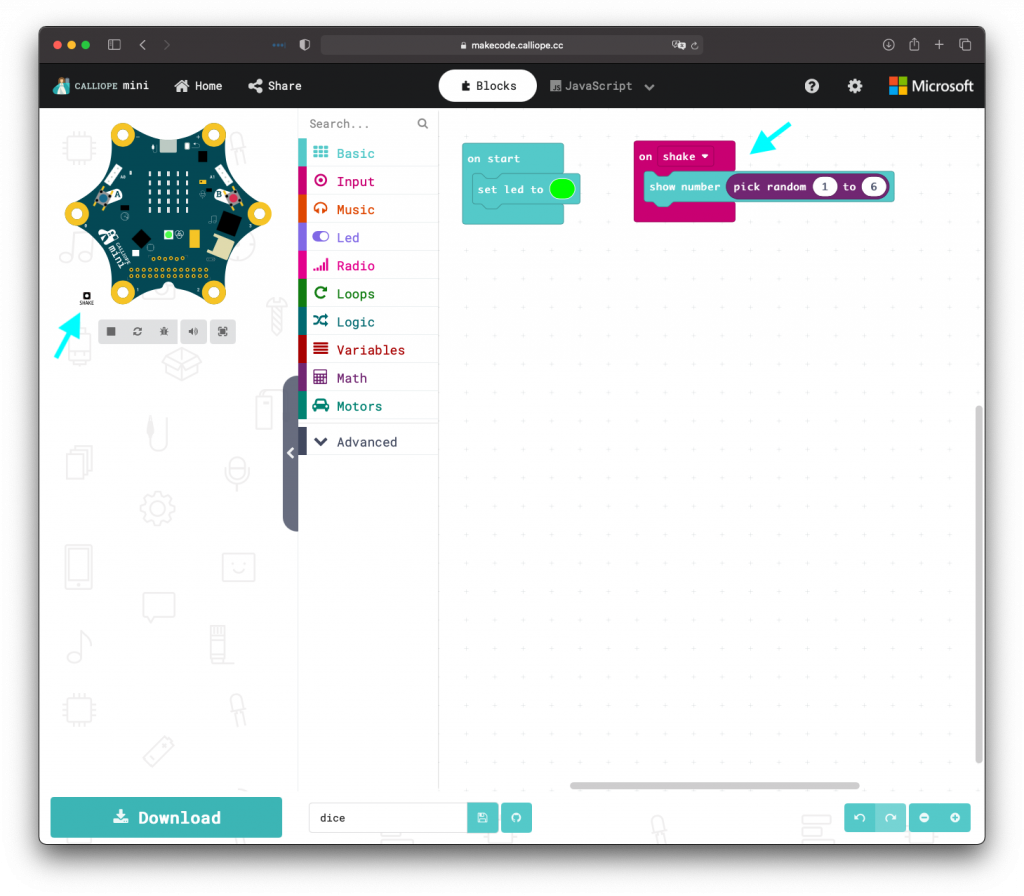
I first selected an “on shake” block under “Input”. This block will perform an action when the Calliope mini is shaken. I want to use the shake to start the roll.
When the roll is started, we want to show a random number between 1 and 6 on the display. In our first program we already got to know the “show string” block, which we used to display the string “Hello, World! Now we use the “show number” block to display a number. We add the block to our “on shake” block. In many programming languages there is a data type called “Number”. In programming, a “Number” represents a number, such as a “2”.
However, we don’t want to always output the same number, but rather roll a new number between 1 and 6 every time we shake the Calliope mini. To solve such a problem, there are predefined blocks that implement mathematical operations, such as addition, subtraction or even determining a random number. Under “Math” we find the block “pick random 0 to 10”, we insert this block into our “show number” block. By clicking on the two numbers we can define the range in which the random number should be. We enter “1” as the smallest number and “6” as the largest number.
If we now run the program in the simulator or copy it to our Calliope mini, each time we shake it, a new number between 1 and 6 will be rolled and shown on the display. You can shake the Calliope mini in the simulator by clicking on the “SHAKE” button at the bottom left of the Calliope mini image.
I hope you enjoyed this little introduction to programming and the world of the Calliope mini! If you found interest in programming, I hope you will stick to it and come up with and implement many projects on your own. If you realized that programming is not for you after all, I hope at least that I could offer you a little insight into the world of programming and that your world has expanded by a small block. 😉